In the last year, I’ve started to work with new firewalls, made by a Swedish company called Clavister. More info on them can be found here: https://www.clavister.com/products/ngfw/
I am not a fan of GUI and learning a new CLI is not that easy. And as I had to do a lot of new site-to-site VPN, where at least one end was a Clavister firewall, I thought to build an Ansible script that is doing it.
I’ve started by creating a template using Jinja2, containing the CLI commands.
{% for subnet in local_nets -%}
add IP4Address {{ subnet }} Address={{ local_nets[subnet] }} -silent -force
{% endfor %}


{% for subnet in remote_nets -%}
add IP4Address {{ subnet }} Address={{ remote_nets[subnet] }} -silent -force
{% endfor %}

add IP4Group {{local_name}}_nets Members= {{ local_nets|join(", ") }} -silent -force
add IP4Group {{remote_name}}_nets Members= {{ remote_nets|join(", ") }} -silent -force

add IP4Address {{ remote_name }}_vpn_gw Address={{ remote_vpn_gw }} -silent -force

add IKEAlgorithms {{ remote_name }}_vpn AESEnabled=True AESMinKeySize={{ AESMinKeySize }} AESKeySize={{ AESKeySize }} {{ SHA }}Enabled=True -silent -force
add IPsecAlgorithms {{ remote_name }}_vpn AESEnabled=True AESMinKeySize={{ AESMinKeySize }} AESKeySize={{ AESKeySize }} {{ SHA }}Enabled=True -silent -force
add PSK {{ remote_name }}_vpn Type=ASCII PSKAscii={{ PSK }} -silent -force
add IPsecTunnel {{ remote_name }}_vpn LocalNetwork=all-nets RemoteNetwork=all-nets RemoteEndpoint={{ remote_name }}_vpn_gw IKEAlgorithms={{ remote_name }}_vpn IPsecAlgorithms={{ remote_name }}_vpn IKELifeTimeSeconds=86400 IPsecLifeTimeSeconds=86400 PSK=Tokyo_vpn IKEVersion=1 DHGroup={{ DHGroup }} PFSDHGroup={{ PFSDHGroup }} AutoInterfaceNetworkRoute=False  ProxyARPInterfaces="" -silent -force

add IPRule Name={{ remote_name }}-to-{{ local_name }}-permit_any Action=Allow SourceInterface={{ remote_name }}_vpn DestinationInterface=any SourceNetwork={{remote_name}}_nets DestinationNetwork={{ local_name }}_nets Service=all_services -silent -force
add IPRule Name={{ local_name }}-to-{{ remote_name }}permit_any Action=Allow SourceInterface=any DestinationInterface={{ remote_name }}_vpn SourceNetwork={{local_name}}_nets DestinationNetwork={{ remote_name }}_nets Service=all_services -silent -force

cc RoutingTable main
{% for subnet in remote_nets -%}
add Route Interface={{ remote_name }}_vpn Network={{ subnet }} Metric=90 Comments="Direct route for {{ remote_name }} network over the vpn" ProxyARPInterfaces="" -silent -force
{% endfor %}
cc ..
In this template, I am creating the objects for IP subnets, the IP groups, the IPsec tunnel, IP policies, and the routing. All the variables used above, I’ve defined in a var file, like this:
# Credentials
username: admin
password: Admin1234

# VPN
local_name: local_VLANs
local_nets:
  vlan10: 10.1.2.0/24
  vlan20: 10.1.3.0/24
remote_name: Tokyo
remote_nets:
  net1: 10.2.3.0/24
  net2: 10.2.4.0/24

PSK: EeFo8vahng5eeQuei5go
AESMinKeySize: 192
AESKeySize: 256
SHA: SHA512
DHGroup: 18
PFSDHGroup: 18
remote_vpn_gw: 192.168.101.101
The next task was to upload the output file that resulted from the template and the var file. For this, I’ve used the shell Ansible module and the SCP and sshpass bash commands.
  - name: copy config to device
      shell:
        cmd: sshpass -p {{ password }} scp out/{{ inventory_hostname }}.sgs  {{username}}@{{ansible_host}}:script/{{inventory_hostname}}.sgs
      ignore_errors: yes
Next, I had to execute the script and then activate and commit the configuration changes. For this, I’ve used the shell module and expect command.
 - name: activate and commit config
      shell: |
        set timeout 20
        spawn sshpass -p {{ password }} ssh {{username}}@{{ansible_host}}

        set prompt {\:\/\>}
        exp_internal 1

        expect -re $prompt
        send "script -execute -name={{inventory_hostname}}.sgs \n"

        expect -re $prompt
        send "activate \n"

        expect -re $prompt
        sleep 5
        send "commit \n"

        expect -re $prompt
        send "exit \n"

        exit 0
      args:
        executable: /usr/bin/expect
The last step was to do a little bit of clean-up and remove the uploaded file from the firewall.
  - name: clean-up
      shell: |
        set timeout 20
        spawn sshpass -p {{ password }} ssh {{username}}@{{ansible_host}}

        set prompt {\:\/\>}
        exp_internal 1

        expect -re $prompt
        send "script -remove -name={{inventory_hostname}}.sgs \n"

        expect -re $prompt
        send "exit \n"

        exit 0
      args:
        executable: /usr/bin/expect
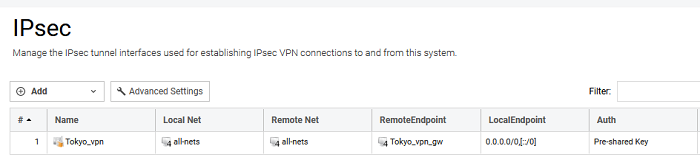
And that was it. Everything was in place on the Clavister firewall.
You can find all the project files here:
https://github.com/czirakim/Ansible.Clavister.VPN